Your listing is what customers see when they search Gig Heaven. A good listing makes a great first impression: a clear name, a punchy description, strong photos, audio or video samples, and honest pricing. This article walks through the whole setup, from creating an empty listing to getting it live.
The "Your listing" area on My Account, with the ADD NEW LISTING button.
Creating your listing
Go to My Account and sign in. You'll need a supplier account, sign up and choose I want to get hired during registration if you're new.
Click Add a listing (also shown as Add new listing on some devices).
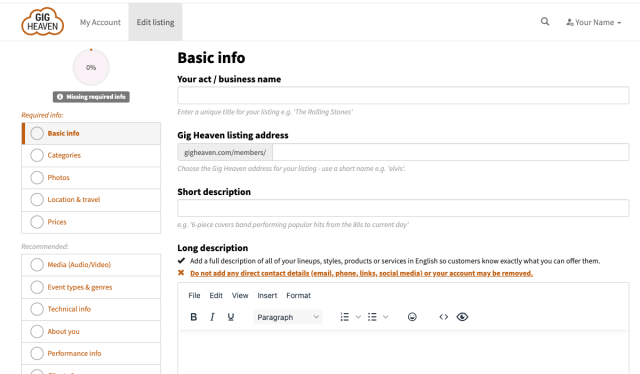
You'll land on the listing editor. It's organised into tabs: About You, Photos, Media (video and audio), Prices, Location & Travel, and more.
An empty listing editor showing the Required info panel and the section tabs along the side.
What you'll need to provide
To activate your listing (make it visible to customers) you need to complete all of the required fields. The editor shows a Required info panel listing what's still missing. In short:
A unique listing name, for example your act or business name.
A short Gig Heaven URL (a slug), for example elvis, which forms part of your listing's web address.
At least one category (for example Singer, Band, or DJ) plus the sub-types that fit best.
A short description (up to 80 characters, shown in search results) and a full description.
Your location, used for location-based searches.
At least one photo.
A pricing choice, either showing prices on your listing or leaving them off.
While you're editing, your listing is saved but not yet visible to customers. Nothing goes live until you activate.
Activating your listing
Once every required field is filled in, the listing status changes from Missing required info to Ready to activate, and an Activate Listing button appears.
Click Activate Listing.
Your listing moves to Activation requested while our team reviews it.
Once approved, your listing is live and shows in search results. You'll get a confirmation email.
Sometimes members want to hide their listing if they aren't taking bookings for a while. To do this, simply contact us with your listing name or registered email address and we can deactivate your listing until you are ready to re-activate it. If you want to completely delete your listing, visit your account and click the Delete Listing button.